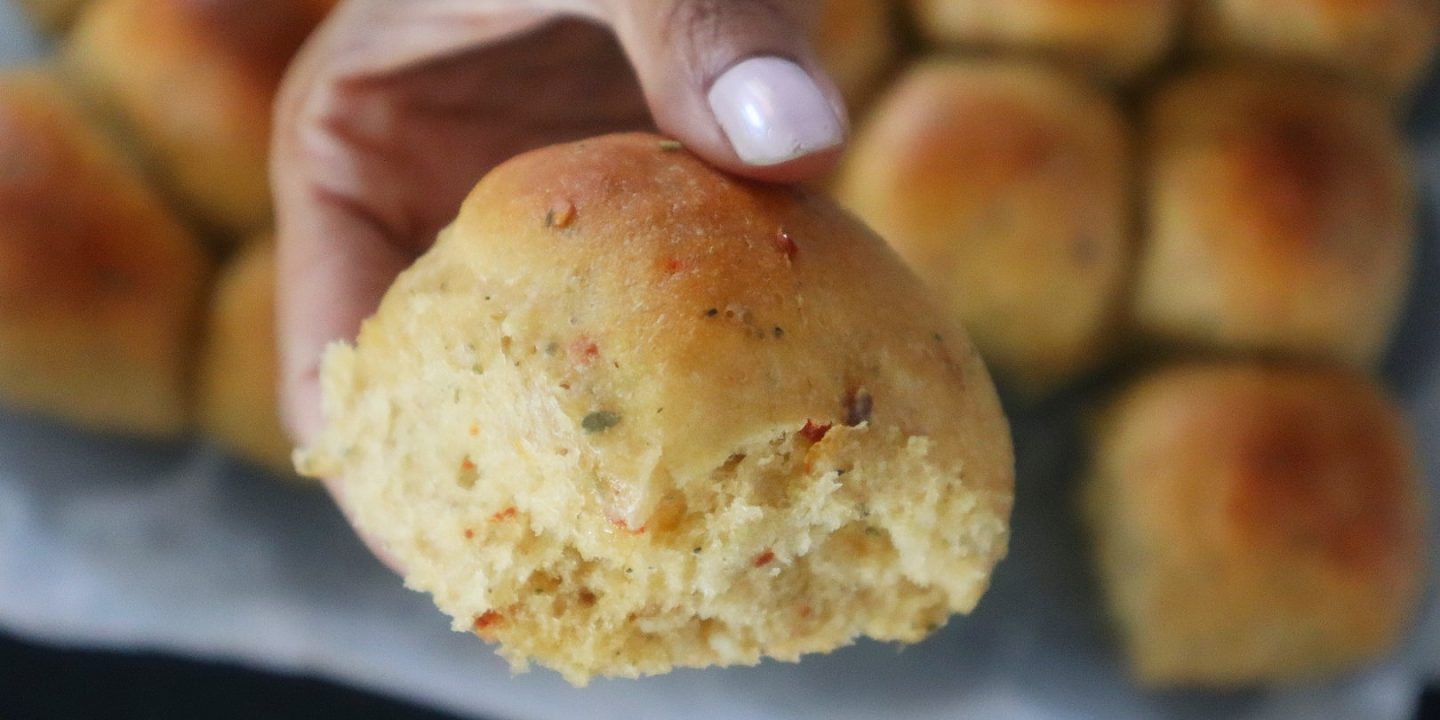
Nothing can beat the aroma of freshly baked bread. I recently made these whole wheat chilli, garlic and herb rolls for one of our meals. And we absolutely adored them. These soft, buttery rolls looked, smelt and tasted absolutely gorgeous and I can’t wait to share the recipe with you today.

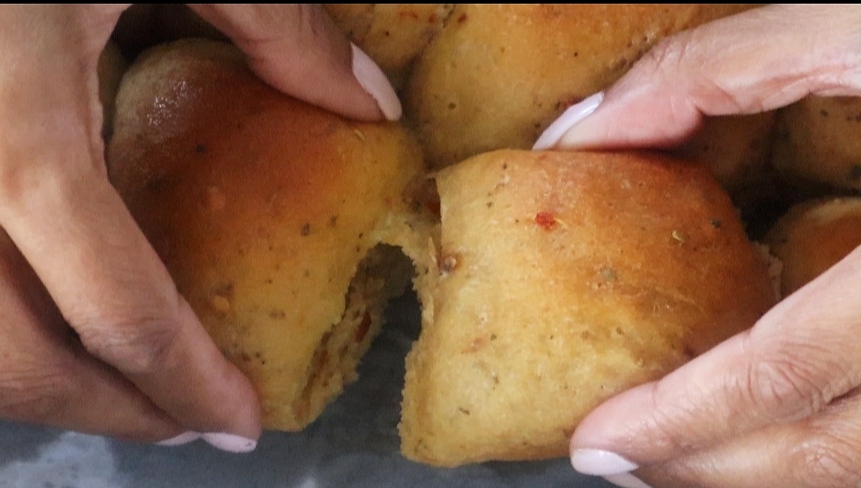
The smells that will emanate from the oven as these rolls bake is utterly divine! The whole wheat gives the nutty texture, the garlic and herbs give plenty of flavour and the chilli gives a slight kick of heat. These rolls are good even on their own, or split and slathered with butter, or in a sandwich or as burger buns or as an accompaniment to soups! And they are soft too! You might have some other ways of enjoying them.
The house was full after ages, with the kids home from university for their spring break. These rolls went down an absolute treat for all of us. I made some chicken patties and with some salad, and layered them between hales of these rolls to make some yummy mini burgers.
Before moving on to the printable recipe and video, a few notes-
Enriched dough-
The egg, butter and milk in this dough enrich it and makes it soft and delicious.
Yeast-
I used easy bake yeast with some warm milk and sugar to activate it. Just make sure that the yeast is within its ‘use by’ date or else the recipe will not work.
Milk-
The yeast is bloomed in warm milk and sugar. The temperature of the milk is very crucial. If it is too hot, it will kill the yeast and the recipe will not work. Generally, it should be just warm to the touch at the time of adding the yeast. Using a thermometer will be helpful in getting the temperature right (about 110 deg F). I used whole milk as it adds to the texture.

Butter-
The butter is melted and incorporated into the dough, thereby enriching it. I have also used some melted butter to brush on top of the rolls after they come out of the oven to give it that extra sheen. It is highly recommended not to skip this stage.
Flour-
I used whole wheat flour (atta) for the recipe which gives it that nutty texture. You can use any plain whole wheat flour. The addition of chilli, garlic and herbs did take it to another level and enhance the taste of the rolls.
Proofing time-
The proofing time may need longer than usual due to the addition of the other ingredients to the flour. I needed 2 hours for the first rise and another hour for the second. So do keep this mind if you are planning to have the rolls on the same day.
Baking pan-
If you do not have a baking pan like mine, you can use other deep cake pans to proof and bake the shaped rolls.


Easy-
Looking at the time needed , one might feel that they might be hard to make. On the contrary, they are quite easy to rustle up. The dough takes some time to rise; and you just need to leave it alone once it is kneaded, shaped etc. The actual hands on time is not that much.
To serve-
These rolls are multi purpose. You can use them to accompany your bowl of soup, make a sandwich or just split them in half , spread some butter and enjoy! We halved them and toasted on a pan. They were then sandwiched with some salad and chicken patties and a garlicky yogurt dressing. Oooh! Just writing about them is making me drool!
These rolls are really delicious, even on their own. They were soft, and the garlic and herbs enhanced their taste and the chilli gave that ever so slight kick of heat. Do give them a try and I hope you enjoy them as much a we did!
Continue reading for the full printable recipe / video for these delicious whole wheat chilli, garlic and herb rolls.
Subscribe to Sunita’s World – life and food! to receive updates on latest posts, tips and recommendations straight to your inbox! Simply fill in the details below. Thank you!
Recipe card-

Whole wheat chilli, garlic and herb rolls
Ingredients
- 2¼ tsp dried yeast
- 1¼ cup warm whole milk (about 110 deg F) + a little extra milk for brushing the top (at room temperature)
- 2 tbsp granulated sugar (see notes below)
- 3 cups + 4tbsp plain whole wheat flour ( I used atta)
- ¼ cup melted butter
- 4 large cloves of garlic, crushed
- 1 tsp salt
- 1¼ tsp Italian seasoning
- 1¼ tsp crushed red chillies
- 1 egg
- 1 tbsp olive oil
Instructions
- Add the yeast to the warm milk along with 1tbsp of sugar. Whisk and leave aside for 7-10 minutes or till frothy.
- In a bowl, add the 3 cups of flour, garlic, Italian seasoning, crushed red chillies, salt and the remaining sugar. Rub everything with the fingertips and keep aside.
- In a large bowl, add the yeast mixture, egg and melted butter and whisk together.
- Tip the flour mixture into the yeast mixture. Use a fork to bring everything together.
- Lightly flour a work surface and tip the mixture onto it.
- Start kneading. The mixture will be very sticky at this stage and will easily break off if pinched.
- Gradually incorporate the remaining 4 tbsp of flour into the dough at intervals and continue kneading. Use the heels of your palm to push out the dough.
- Knead for about 6-7 minutes.
- Pour ½ tbsp olive oil into your palm and continue kneading for another 6-7 minutes or until smooth. When you pull one end of the dough, it should be easily stretchable.
- Shape the dough into a ball.
- Grease a large bowl ( there needs to be enough room for the dough to double in size) with a little from the remaining olive oil and place the dough in it. Rub the rest of the olive oil over the top of the dough. Cover with cling film and leave to rise in a warm place for about 2 hours or until doubled in size.
- Tip the dough on to your work surface; there is no need to flour it this time.
- Slightly flatten the dough and divide into 16 portions of approximately 46 gms each. You can eyeball or use scales for better accuracy.
- Line a baking pan ( 7½ by 11½ inches) with non stick paper.
- Pinch the edges of each dough portion inwards. Place them on the work surface, so that the smooth end is facing the top. Cup the portion with your hand and move in circular motions. Arrange them on the baking tray slightly apart from each other.
- Cover with cling film and let it rise for another hour.
- Pre heat the oven at 180 deg C (fan).
- Brush the tops with a little milk and bake in the lower rack of the oven for about 25 minutes or till golden.
- Take out of the oven and immediately brush the tops with a little melted butter.
- Serve immediately. If using later, cool completely on a rack before storing in an airtight container. I kept ours at room temperature and had them the next day.
- This bread tastes best when warm.
Video
Notes
- I used demerara sugar as that was what I had; you can use regular granulated sugar.
- I used easy bake yeast with some warm milk and sugar to activate it. Just make sure that the yeast is within its ‘use by’ date or else the recipe will not work.
- The yeast is bloomed in warm milk and sugar. The temperature of the milk is very crucial. If it is too hot, it will kill the yeast and the recipe will not work. Generally, it should be just warm to the touch at the time of adding the yeast. Using a thermometer will be helpful in getting the temperature right (about 110 deg F). I used whole milk as it adds to the texture.
- The butter is melted and incorporated into the dough, thereby enriching it. I have also used some melted butter to brush on top of the rolls after they come out of the oven to give it that extra sheen. It is highly recommended not to skip this stage.
- I used whole wheat flour (atta) for the recipe which gives it that nutty texture. You can use any plain whole wheat flour. The addition of chilli, garlic and herbs did take it to another level and enhance the taste of the rolls.
- The proofing time may need longer than usual due to the addition of the other ingredients to the flour. I needed 2 hours for the first rise and another hour for the second. So do keep this mind if you are planning to have the rolls on the same day.
- If you do not have a baking pan like mine, you can use other deep cake pans to proof and bake the shaped rolls
All baking recipes on this blog can be found here.
You might also like to try these recipes from my blog-

Until next time,
Sunita
STAY CONNECTED:
So happy your blog is back Sunita! I had been following it since 2006/07 when I was a college student and it was one of my favorite blogs. Thrilled to see its return!
Thank you so much for your kind words; will definitely try to keep this up.