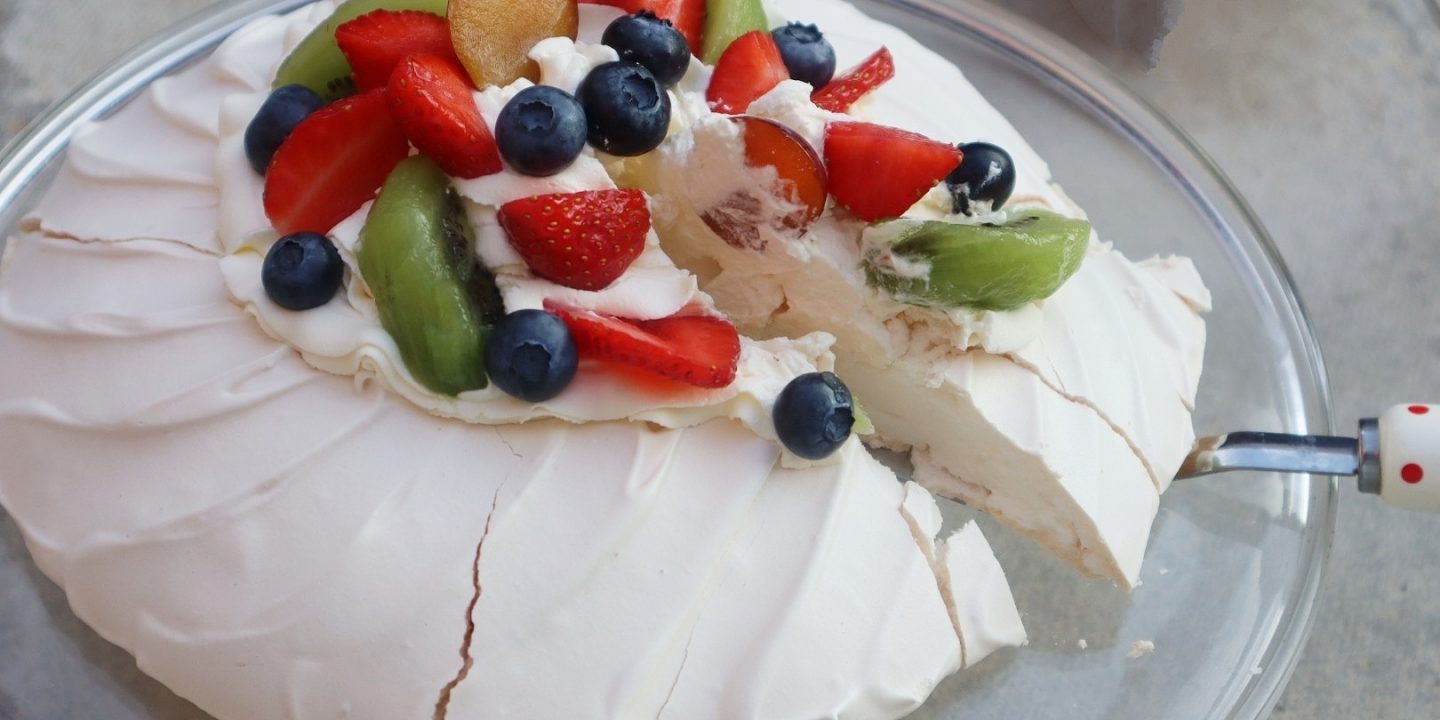
I made this pavlova recipe after a long time! The last time I made it was many moons ago! But I was quite chuffed when it came out with the perfect crisp exterior and soft marshmallowy interior that pavlovas are known for. The daughter declared it the best she’s ever had!

We have had a glug of summer fruit and have been trying to use it in various ways in addition to using them as they are. And this light dessert is a perfect way to use them. You can use whatever fruit you have available.
Pavlova?
This dessert was said to have originated sometime during the 1920s in honour of the Russian ballerina Anna Pavlova during her tours to Australia and New Zealand.
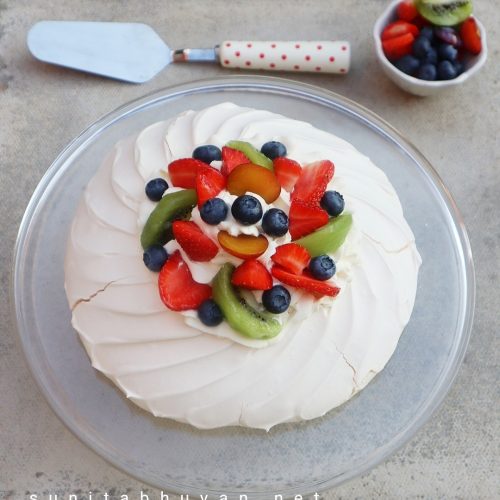
Although, nowadays there are many variations, a traditional pavlova has three components- a meringue base, whipped cream and fresh fruit. The meringue base, as I mentioned earlier has a crisp exterior and a soft marshmallowy interior. After baking and cooling, the whipped cream is slathered over the meringue base and topped with fresh fruit. Every mouthful is an explosion of texture and flavours; the bite from the meringue exterior, the softness from the cream and the gooey interior and the freshness from the fruit.
You can use whatever fruit you have available.

Ingredients-
One needs just five ingredients to make this pavlova. Namely egg whites, caster sugar, lemon juice/vinegar, cornflour and vanilla extract.
The eggs need to very carefully separated, as even the tiny bit of yolk will affect the meringue. I suggest doing this one egg at a time, separating the yolk and egg white into two small bowls and then tipping the egg white into the larger bowl to be used for mixing. Don’t discard the egg yolks. They can be used make other things – I will be sharing a recipe with egg yolks soon!

Bowl /whisks-
Use clean and dry bowls and whisks. The slightest trace of grease will affect the meringue.
Assembly /serving-
Assemble the pavlova closer to eating time. To serve, cut into wedges with a knife. It might be a bit tricky, but once it’s cut and transferred to a plate, it will hold it’s shape.

Cracks-
Don’t worry if you see slight cracks on the pavlova; it is quite normal and will not affect the texture.

Storage-
Any leftovers should be stored in the fridge and best consumed within 24 hours.

Continue reading for this delicious pavlova recipe.
Subscribe to Sunita’s World – life and food! to receive updates on latest posts, tips and recommendations straight to your inbox! Simply fill in the details below. Thank you!
Recipe card-
Pavlova
Ingredients
Meringue base
- 4 egg whites
- 1¼ cup caster sugar
- 2 tsp cider vinegar or lemon juice
- 1 tsp vanilla extract
- 1 tsp cornflour
Topping
- 200 ml double cream
- 2 tsp icing sugar
- 1 tsp vanilla extract
- fresh fruit of choice( I used kiwis, strawberries, plums and blueberries)
Instructions
- Pre heat the oven at 130 deg C.
- Beat the egg whites with an electric whisk till bubbles start to form.
- Increase the speed and continue to whisk till it forms soft peaks.
- Add the sugar, a tablespoon at a time and continue whisking at medium speed till all the sugar is added.
- Continue to whisk at a high speed till stiff peaks form and all the sugar has dissolved. If you rub a little of the mixture between your thumb and forefinger, you should not feel the sugar.
- Add the vinegar / lemon juice and vanilla extract and whisk till just combined.
- Add the cornflour and fold in with a metal spoon till well incorporated.
- Add four small blobs of the meringue to the four corners of a baking tray. Place a piece of parchment paper on top of the tray, pressing down on the meringue blobs. This helps to hold the paper in place while shaping.
- Tip the meringue onto the centre of the parchment in a mound and spread out into a round of 9 inches in diameter. Shape it like a crater with the sides higher than the centre. This is to help hold the topping. You can put it in the oven at this stage for a rustic look. I wanted to pretty up mine, so used a spatula to smooth the sides and used a smaller spatula to make strokes all round. Each stroke was from the bottom to the top.
- Place the tray in the centre of the pre heated oven and bake for 10 minutes.
- Reduce the oven temperature to 100 deg C and bake for another 1 and a 1/2 hours.
- Switch off the oven and let it cool completely inside the oven.
- Don't worry if you see slight cracks on the outside of the meringue. It is quite normal and does not affect the texture of the meringue.
The topping-
- In a bowl, combine the double cream, icing sugar and vanilla extract.
- Whisk until soft peaks form.
- Chop /slice the bigger pieces of fruit and keep aside.
Assembly-
- Place the pavlova onto a serving plate.
- Spoon the cream over it; the concave middle will help hold it in place.
- Arrange the fresh fruit on top.
- Cut in wedges and serve immediately.
- Store any leftovers in the fridge.
All my dessert recipes can be found here.
You might also like to try the following recipes from my blog-


Until next time,
Sunita
STAY CONNECTED:
I dreamed of making this since a looong time. Never had the courage to start. Your recipe looks less intimidating and it gives me the courage to try 🙂
Thank you, do give it a try.:-)